Wednesday, May 31, 2023

Learning Journey#4. Understanding REST APIs: for Beginners

Welcome to the "Learning Journey" series. This space is my personal archive where I share insights and discoveries from my explorations into new tech territories, particularly back-end development and cloud services. As I continue to broaden my tech understanding, I hope this series inspires and contributes to your own learning journey.

Introduction

https://uxwing.com/rest-api-icon

An API, or application programming interface, is a way for two pieces of software to communicate with each other. REST, or Representational State Transfer, is a set of architectural principles for designing APIs. REST APIs are the most common type of API and are employed in a wide array of applications, such as web browsers, mobile apps, and server-to-server communication.

What is a REST API?

A REST API is an API that adheres to the REST architectural principles. These principles dictate how an API should be designed, including how requests should be formulated, how responses should be formatted, and how errors should be managed.

The core principles of REST include:

REST API Principle Description
Stateless The server should not store any state about the client, meaning that each client request should be independent of previous ones.
Client-server The client and server should function independently of each other, implying that the client need not know anything about the server, and vice versa.
Cacheable The server should permit clients to cache responses to improve performance by decreasing the number of server requests.
Layered system The API should be designed as a layered system, meaning that it should be divided into different layers, each offering a specific set of functionalities.
Uniform interface The API should use a uniform interface, implying that all API requests should use the same methods and formats.


Why Use REST APIs?

REST APIs offer several advantages:

  • Scalability: Due to their stateless nature and layered system, REST APIs can effectively support an increasing number of requests, making them suitable for large, growing applications.
  • Simplicity: The ease of use of REST APIs makes them a preferred choice for developers, especially those new to APIs.
  • Performance: REST APIs can enhance efficiency by using techniques like caching to reduce server requests.
  • Modifiability: REST APIs are adaptable and can be easily changed to accommodate the evolving needs of your application.

Components of a REST API

A REST API is composed of several elements:

  • Base URL: The base URL is the starting point for all API requests.
  • Path: The path in the URL identifies the specific resource that you are trying to access.
  • HTTP method: The HTTP method denotes the type of request you're making. The most common HTTP methods are GET, POST, PUT, and DELETE.
  • Headers: Headers supply additional information about the request, such as the content type of the request or the authorization credentials.
  • Query parameters: Query parameters are utilized to filter or sort the results of a request.

Detailed explanations for these components can be found in resources like the Mozilla Developer Network.

REST APIs vs. Other API Styles

API styles like SOAP and GraphQL also exist. SOAP is a more intricate API style than REST and uses XML to format requests and responses, potentially increasing its complexity. GraphQL is a newer API style designed to offer more flexibility than REST. It enables you to request specific data from the server, which can enhance performance. A comprehensive comparison between these styles, however, would be a topic for a separate, more in-depth post.


Common HTTP Methods in REST APIs

REST APIs typically use four basic HTTP methods for interaction with resources:

  • GET: Retrieves a representation of a resource without modifying it. GET requests can be cached and bookmarked.

  • POST: Sends data to the server to create a new resource. The server generates the unique identifier for the new resource.

  • PUT: Updates a known resource. It replaces the entire resource with the new content.

  • DELETE: Deletes a specified resource.

In practice, these methods are used to construct a complete API that can create, read, update, and delete resources – commonly referred to as a CRUD interface.
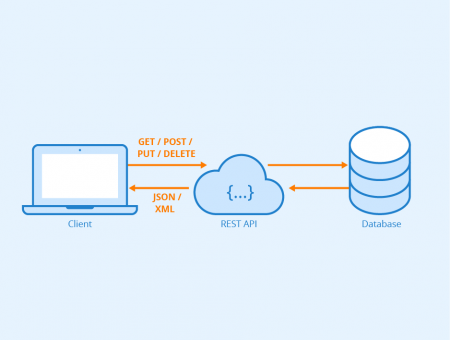
REST API - Author: Seobility - License: CC BY-SA 4.0
https://www.seobility.net/en/wiki/REST_API

JSON in REST APIs

JSON (JavaScript Object Notation) is a common format for sending and receiving data in a REST API. JSON provides a simple, text-based way to represent structured data. It is human-readable, and easy for both machines and humans to write and parse. Here's a simple example of what a JSON response might look like:

{
  "name": "John Doe",
  "email": "john@example.com",
  "id": 123
}

In this example, the server is responding with a JSON object that represents a user, including their name, email, and id.


Building Your First REST API

If you're new to REST APIs, start by building a simple one. Many frameworks, such as Express.js, can assist in creating REST APIs. After building a basic API, you can delve deeper into REST architectural principles and design more complex APIs.

Common Tools for Interacting with REST APIs

Numerous tools can be used to interact with REST APIs. Some popular ones include:

  • Postman: This popular tool is used for testing and interacting with REST APIs. It allows you to send requests to the API, view the responses, and debug errors.
  • curl: curl is a command-line tool that can be used to send requests to REST APIs. It is a suitable choice for developers who wish to automate REST API testing.

Conclusion

REST APIs are powerful tools that facilitate the interaction between different applications and services. Understanding the basics of REST APIs enables you to build more robust and flexible applications. The journey of learning and implementing REST APIs may seem challenging at first, but with the right resources and consistent practice, you can become proficient and leverage their power in your projects.

Friday, May 26, 2023

Learning Journey #3. Spring Framework

Welcome to the "Learning Journey" series. This space is my personal archive where I share insights and discoveries from my explorations into new tech territories. we're going to dive into a game-changer in the world of Java-based enterprise applications: the Spring Framework.


1. Background: The Evolution of Spring

At the beginning of enterprise Java, EJB (Enterprise JavaBeans) was the dominant choice for building robust enterprise applications. However, the complexities of EJB did not blend well with modern architectural trends, which required a simpler, more lightweight solution. This need led to the birth of the Spring Framework.

Over time, Spring has evolved from a remedial framework to combat the complexities of EJB to a comprehensive suite of projects addressing a wide array of enterprise Java needs. It now includes everything from a security framework to a full-fledged MVC web application framework.

2. Understanding the Spring Framework

The Spring Framework is a comprehensive, yet lightweight solution for building enterprise applications in Java. It emerged as a response to the intricate nature of enterprise application development, providing a simpler, more flexible, and modular approach.

3. The Pillars of the Spring Framework

The Spring Framework is built upon several key principles:

  • Inversion of Control (IoC): Also known as Dependency Injection (DI) and Dependency Lookup (DL), IoC shifts the responsibility of managing dependencies from the programmer to the framework itself. This results in more modular and testable code.
  • Plain Old Java Object (POJO): Spring advocates for the use of POJOs, which are straightforward, reusable, and testable Java objects that aren't bound to a specific framework.
  • Aspect-Oriented Programming (AOP): AOP is a programming paradigm that aims to increase modularity by separating cross-cutting concerns. It does this by breaking down the program logic into distinct parts (called "aspects"). For example, logging is a concern that cuts across multiple methods, classes, and layers in an application. Using Spring AOP, you can separate this logging concern from the core business logic, making the code cleaner and easier to maintain.
  • Model-View-Controller (MVC): The Spring MVC web application framework provides a clear separation of concerns among the roles in the application, and is a highly flexible, robust alternative to traditional heavyweight frameworks.
  • Modularity: The modularity of Spring allows developers to use only the components they require, instead of being forced to adopt the entire framework.

4. Inside the Spring Framework Architecture

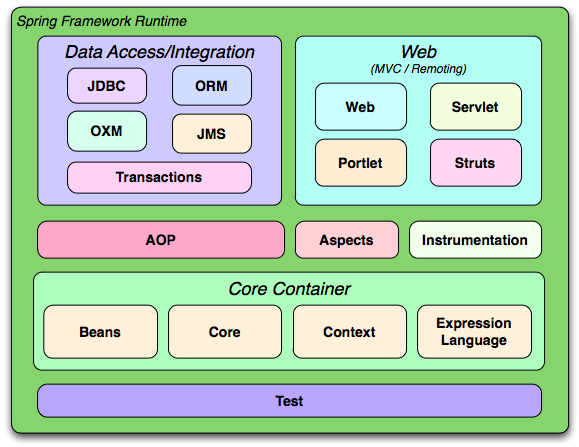
https://docs.spring.io/spring-framework/docs/3.0.x/spring-framework-reference/html/overview.html

The Spring Framework has a layered architecture comprising various well-structured modules like Core Container, Data Access/Integration, Web, AOP (Aspect Oriented Programming), Instrumentation, and Test. A detailed diagram of the Spring Framework architecture can help visualize how different modules work together and allow developers to keep their applications lightweight and optimized.

5. Introducing Spring Boot

Spring Boot is an extension of the Spring Framework, designed to simplify the initial setup and configuration of a new Spring project. With its opinionated approach to the Spring platform and third-party libraries, Spring Boot allows developers to start projects quickly, making it an ideal choice for developing microservices.

6. Java EE vs. Spring Boot: A Comparative Look

Feature Java EE Spring Boot
Startup Time Can be lengthy due to application server startup Extremely fast, ideal for microservices
Configuration XML based, can be verbose Convention over configuration, minimal setup
Dependency Injection Uses CDI Uses Spring's Dependency Injection
Data Access Uses JPA Supports JPA and Spring Data
Flexibility Bound to the specifications Highly customizable
Learning Curve Steeper, requires understanding of various specifications Easier to start with due to auto-configuration and embedded server
Community and Support Supported by various vendors, larger community Robust community support, primarily driven by Pivotal
Packaging and Deployment Usually requires an application server for deployment Standalone applications with embedded servers, easy to deploy
Microservices Support Can be more complex to setup Built with microservices in mind

Java EE (Enterprise Edition) provides a standardized API and runtime environment for building and running large-scale, multi-tiered, scalable, reliable, and secure network applications. Despite the comprehensive solution offered by Java EE, Spring Boot brings a more

lightweight, flexible approach, and has managed to simplify many of the complexities that exist in Java EE. Thus, Spring Boot has gained significant popularity among developers looking for a streamlined and efficient development process.

In the next part of my Learning Journey, I will delve into more interesting features. Stay tuned!

Thursday, May 25, 2023

Daily#14. Understanding JVM, Dalvik, and ART: The Engines Behind Java and Android Applications

Introduction

Developing applications in Java or for the Android platform requires an understanding of the runtime environments where these applications run. A runtime environment refers to the state of the system when a program is executed. It includes the settings, libraries, and other supporting infrastructure that the system provides to the program. Understanding runtime environments is crucial as they dictate how a program will behave when executed. Java Virtual Machine (JVM) is the original runtime environment for Java, but is not used on Android. Dalvik and ART, on the other hand, are newer runtime environments that were specifically designed for Android. This post will guide you through the functionality of JVM, Dalvik, and ART.

What is JVM?

The Java Virtual Machine (JVM) is an abstract computing machine that enables a computer to run a Java program. Here are the key characteristics of JVM:

https://en.wikipedia.org/wiki/Java_virtual_machine


  • Platform Independence: Java's "write once, run anywhere" principle is enabled by JVM's ability to interpret Java bytecode into the machine code of the host device.
  • Memory Management: JVM handles object allocation and de-allocation in memory through a process called garbage collection. Garbage collection is an automatic memory management scheme that reclaims the heap space occupied by objects that are no longer in use by the program.
  • Execution of Bytecode: JVM interprets and executes the compiled Java bytecode line by line, translating it into the machine code that the host device can understand.

What is Dalvik?

Dalvik is a virtual machine designed specifically for Android and was the default Android runtime until Android 5.0 (Lollipop), after which it was replaced by Android Runtime (ART). Here are the key characteristics of Dalvik:

  • Designed for Devices with Limited Resources: Dalvik was built keeping in mind the constraints of device resources like memory and battery. It does so by converting .class files, which are relatively heavy, into .dex (Dalvik Executable) format. The .dex files are much lighter and optimized for minimal memory footprint.
  • Executes .dex Files: Java code in Android applications is converted into .dex files, which are more memory efficient than traditional .class files used by JVM.
  • Register-Based: Unlike the JVM, which is stack-based, Dalvik is a register-based machine, typically leading to fewer instructions, but more complex ones.

What is ART?

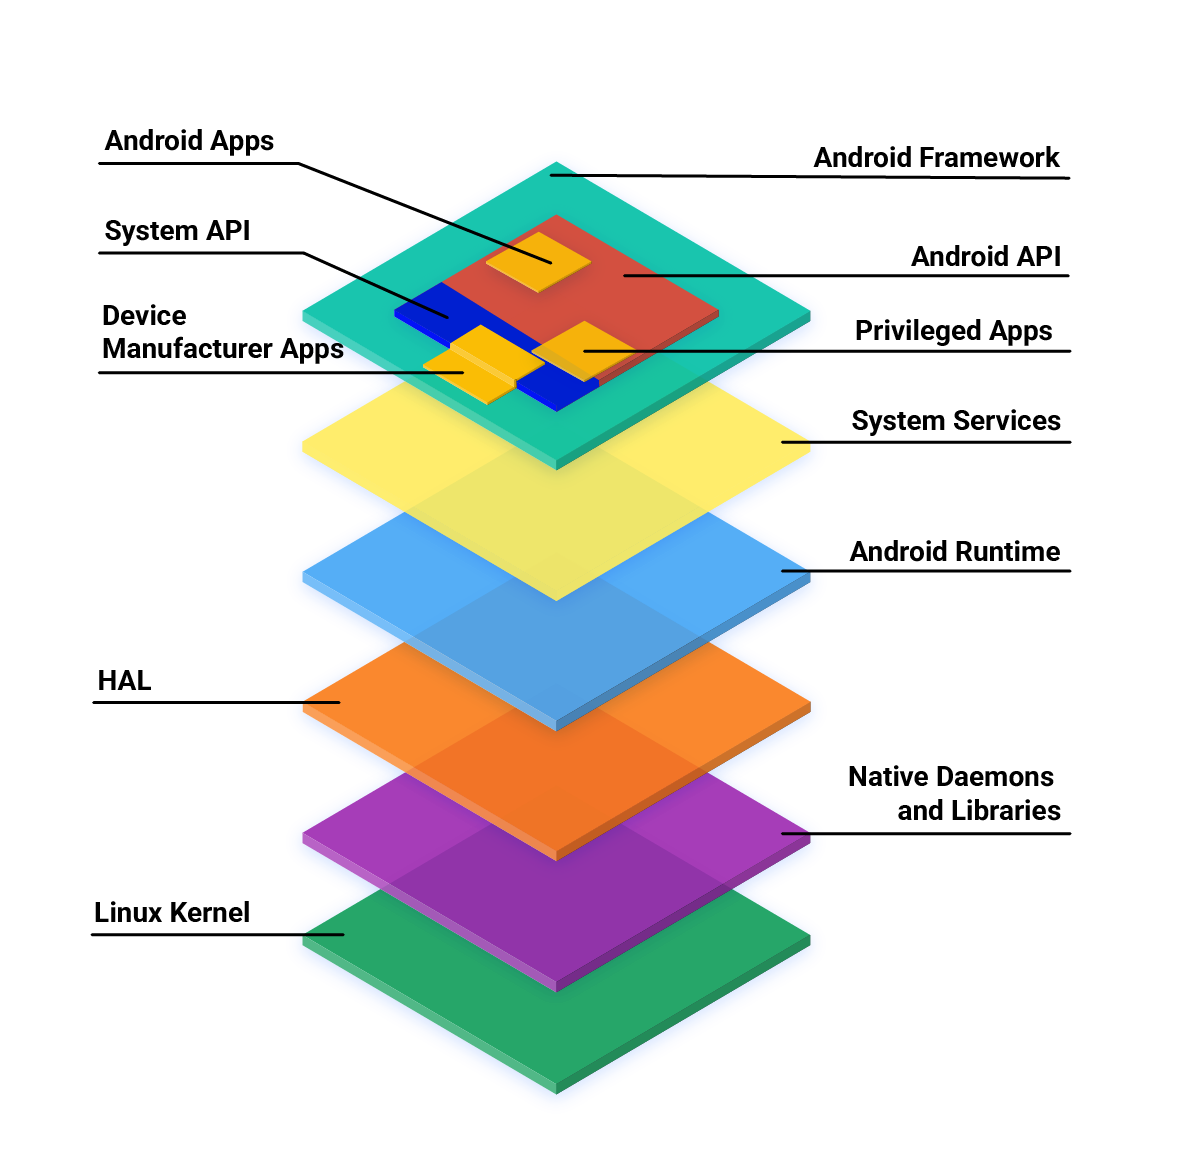
https://source.android.com/docs/core/architecture


The Android Runtime (ART) is the current runtime used by Android applications, introduced as a replacement for Dalvik in Android 5.0 (Lollipop). ART is still under development, and new features and optimizations are being added all the time. Here are the key characteristics of ART:

  • Ahead-of-Time (AOT) Compilation: Unlike Dalvik, which used Just-In-Time (JIT) compilation, ART performs AOT compilation. This means that the bytecode is compiled into machine code upon app installation, leading to improved performance.
  • Garbage Collection: ART implements improved garbage collection over Dalvik, reducing pauses and overhead during application runtime.
  • Backwards Compatibility: ART can execute apps targeted for the Dalvik runtime by translating the Dalvik bytecode. This ensures older applications can still run on newer versions of Android, preserving the vast library of Android apps across updates.

JVM vs. Dalvik vs. ART: Key Differences

Here's a table that shows the key differences between JVM, Dalvik, and ART:

Feature JVM Dalvik ART
Execution Runs .class files Runs .dex files Compiles .dex files
Garbage Collection Generational GC Concurrent GC Improved GC
Performance Optimization Just-In-Time (JIT) Initially interpreted, later included JIT Ahead-Of-Time (AOT) compilation
Application Isolation Each app runs on separate JVM Multiple apps run concurrently within separate Dalvik instances Each app runs on separate ART instance


All three—JVM, Dalvik, and ART—have been designed with very different goals and optimizations in mind. Understanding the workings of these VMs can provide valuable insights into optimizing your Java and Android application's performance. I hope you found this comparison informative! Feel free to leave comments or ask questions below. Stay tuned for more informative posts!

Tuesday, May 23, 2023

Daily #13: Diving Deeper Into Android Events: Location Tracking, Screen On/Off, Orientation Changes, Battery Status, Incoming Calls/SMS, and Pedometer

Welcome back to our daily tech series! Today, we're delving deeper into some essential Android events and features that you can implement in your apps to enhance user experience. Let's get started.

Location Tracking

Android provides the LocationManager for accessing system location services. This lets your app request location updates from GPS or network providers. Here's an example:

LocationManager locationManager = (LocationManager) getSystemService(Context.LOCATION_SERVICE);
Criteria criteria = new Criteria();
criteria.setAccuracy(Criteria.ACCURACY_FINE);
String bestProvider = locationManager.getBestProvider(criteria, true);

LocationListener locationListener = new LocationListener() {
    public void onLocationChanged(Location location) {
        // Called when a new location is found by the network location provider.
        // Do something with the location.
    }
    // Override other methods as needed
};

// Request location updates
locationManager.requestLocationUpdates(bestProvider, 0, 0, locationListener);

For more information, visit the Android developer's guide on location.

Screen On/Off

Android sends broadcast intents (Intent.ACTION_SCREEN_ON and Intent.ACTION_SCREEN_OFF) when the device's screen turns on and off. You can create a BroadcastReceiver to listen for these changes:

BroadcastReceiver screenStateReceiver = new BroadcastReceiver() {
    @Override
    public void onReceive(Context context, Intent intent) {
        if (Intent.ACTION_SCREEN_ON.equals(intent.getAction())) {
            Log.i(TAG, "Screen turned on");
        } else if (Intent.ACTION_SCREEN_OFF.equals(intent.getAction())) {
            Log.i(TAG, "Screen turned off");
        }
    }
};

More details are available in the official Android developer guide on Broadcasts.

Orientation Changes

When a device's orientation changes, the system destroys and recreates the visible activity. You can handle such changes in your activity's lifecycle methods, particularly onConfigurationChanged:

@Override
public void onConfigurationChanged(Configuration newConfig) {
    super.onConfigurationChanged(newConfig);

    if (newConfig.orientation == Configuration.ORIENTATION_LANDSCAPE) {
        Log.i(TAG, "Landscape");
    } else if (newConfig.orientation == Configuration.ORIENTATION_PORTRAIT){
        Log.i(TAG, "Portrait");
    }
}

See the Android developer's guide on handling runtime changes for more information.

Battery Level and Charging Status

By monitoring the battery level and charging status, your app can adapt its behavior to maintain a good user experience even under low battery conditions. Android broadcasts Intent.ACTION_BATTERY_CHANGED when the battery level or charging state changes:

BroadcastReceiver batteryReceiver = new BroadcastReceiver() {
    @Override
    public void onReceive(Context context, Intent intent) {
        int level = intent.getIntExtra(BatteryManager.EXTRA_LEVEL, -1);
        int status = intent.getIntExtra(BatteryManager.EXTRA_STATUS, -1);
        boolean isCharging = status == BatteryManager.BATTERY_STATUS_CHARGING ||
                             status == BatteryManager.BATTERY_STATUS_FULL;
        // Do something with this info
    }
};

IntentFilter ifilter = new IntentFilter(Intent.ACTION_BATTERY_CHANGED);
Intent batteryStatus = context.registerReceiver(batteryReceiver, ifilter);

More details can be found in the [Android developer's guide on monitoring the battery level and charging state](https://developer.android

.com/training/monitoring-device-state/battery-monitoring).

Incoming Calls/SMS

If your app needs to be aware of incoming calls or SMS messages, Android provides TelephonyManager and PhoneStateListener:

TelephonyManager telephonyManager = (TelephonyManager) getSystemService(TELEPHONY_SERVICE);
PhoneStateListener callStateListener = new PhoneStateListener() {
    public void onCallStateChanged(int state, String incomingNumber) {
        if (state == TelephonyManager.CALL_STATE_RINGING) {
            Log.i(TAG, "Incoming call: " + incomingNumber);
        }
    }
};
telephonyManager.listen(callStateListener, PhoneStateListener.LISTEN_CALL_STATE);

See the Android developer's guide on intercepting phone calls and receiving SMS messages for more information.

Pedometer

The Android platform provides a Step Counter sensor to track the number of steps the user has taken since the last device reboot. Here's a basic example:

SensorManager sensorManager = (SensorManager) getSystemService(Context.SENSOR_SERVICE);
Sensor countSensor = sensorManager.getDefaultSensor(Sensor.TYPE_STEP_COUNTER);
if (countSensor != null) {
    sensorManager.registerListener(new SensorEventListener() {
        @Override
        public void onSensorChanged(SensorEvent event) {
            int steps = (int)event.values[0];
            // Do something with this info
        }

        @Override
        public void onAccuracyChanged(Sensor sensor, int accuracy) {
            // Handle accuracy changes
        }
    }, countSensor, SensorManager.SENSOR_DELAY_UI);
} else {
    Log.e(TAG, "Step Counter sensor not available!");
}

For more details, refer to the official Android Sensor documentation.

Network Changes

Keeping track of the network state is crucial for apps with online functionalities. You can use the ConnectivityManager to listen to network changes and adapt your app accordingly. For more details on handling network changes, refer to this post: "Daily#6 Understanding and Using ConnectivityManager".

Understanding and implementing these features can significantly enhance your app's functionality and user experience. Happy coding!

Monday, May 22, 2023

Daily#12: Networking in Android - Understanding ConnectivityManager and Network APIs

Hello everyone! Today, let's delve into Android's networking capabilities. We'll concentrate on the ConnectivityManager class and the Network API, both of which provide applications the means to specify a network interface for communication with external networks.

ConnectivityManager and bindProcessToNetwork

Let's start with ConnectivityManager, a class that provides network connectivity status and updates applications when this connectivity changes. One crucial method in this class is bindProcessToNetwork.

ConnectivityManager cm = (ConnectivityManager) getSystemService(Context.CONNECTIVITY_SERVICE);
Network network = ... // Your desired network
cm.bindProcessToNetwork(network);

Using bindProcessToNetwork, an application can dedicate a Network object for its network traffic. Therefore, all traffic from the application will be routed over this specified network.

Acquiring a Network Object

You may be wondering how to get a Network object to use with bindProcessToNetwork. There are several ways to do so:

  1. NetworkCallback (refer : previous post)
ConnectivityManager.NetworkCallback networkCallback = new ConnectivityManager.NetworkCallback() {
   @Override
   public void onAvailable(Network network) {
      // Use network object here
   }
};
  1. getActiveNetwork
Network activeNetwork = cm.getActiveNetwork();

With a Network object at hand, we can utilize the Network class's methods to control network traffic.

Network and its methods: bindSocket, getSocketFactory, openConnection

The Network class represents a network interface. It has several key methods:

  1. bindSocket(Socket socket): Binds the specified Socket to this Network, ensuring that all data traffic from the Socket will be sent over this Network.
Network network = ... // Your Network
Socket socket = new Socket();
network.bindSocket(socket);
OutputStream os = socket.getOutputStream();
os.write("Hello, world!".getBytes());
os.close();
socket.close();
  1. getSocketFactory(): Returns a SocketFactory that creates Sockets bound to this Network.
SocketFactory sf = network.getSocketFactory();
Socket socket = sf.createSocket("example.com", 80);
OutputStream os = socket.getOutputStream();
os.write("Hello, world!".getBytes());
os.close();
socket.close();
  1. openConnection(URL url): Opens a URLConnection over this network. It can be used to create an InputStream or OutputStream.
URL url = new URL("http://example.com");
URLConnection connection = network.openConnection(url);
InputStream is = connection.getInputStream();
// Use InputStream here
is.close();

By utilizing these methods, an application can explicitly send network traffic over a particular network interface, ensuring that data is routed correctly.

Remember, this is just a brief dive into Android's vast networking capabilities. There are many more classes and methods to explore. As always, refer to the official Android documentation for more details and don't stop experimenting!

Learning Journey#2: Docker and Kubernetes: A Journey into Containerization and Orchestration

 Welcome to the "Learning Journey" series. This space is my personal archive where I share insights and discoveries from my explorations into new tech territories. Today, we're diving into Docker and Kubernetes - two essential tools for modern software development.

1. The Need for Efficient Software Deployment

In our digital era, software deployment is a critical aspect of delivering value to users. However, traditional deployment methods have their shortcomings - compatibility issues across different environments, longer development cycles, difficulties in managing and scaling applications, to name a few.

2. Introducing the Solution - Containerization

To address these issues, the concept of "containerization" comes into play. Imagine packing your application and all its dependencies into a box (or "container") - this way, you can be sure it will work the same way, no matter where you open it.

3. Unveiling Docker - Master of Containers

Welcome Docker, a tool that leverages containerization. Docker allows developers to create, deploy, and manage applications that are agnostic to the environment they run in, thereby addressing many of the issues associated with traditional software deployment.

4. Why Orchestration Matters
As you might imagine, when we start dealing with multiple containers, management can get complex. For example, how do we ensure these containers can communicate, or distribute resources amongst them? Enter the need for an orchestration system.

5. Say Hello to Kubernetes - Orchestrating Containers

Kubernetes, an open-source platform, handles the orchestration of containers. It ensures the containerized applications run as intended, provides mechanisms for scalability, and maintains high availability of applications, among other benefits.

6. The Symphony of Docker and Kubernetes

Finally, Docker and Kubernetes make a harmonious duo. While Docker wraps up and isolates our applications in containers, Kubernetes manages these containers in a bigger system. Together, they offer a robust and efficient system for deploying, managing, and scaling applications.

This is just the start of our journey into Docker and Kubernetes. In the coming posts, we'll explore these technologies further and delve into their mechanics.

Tuesday, May 16, 2023

Daily#11. Establishing Wi-Fi Connection using WifiNetworkSpecifier and WifiNetworkSuggestion

 Welcome back to our daily tech series! Today, we're diving into how to connect to a Wi-Fi network programmatically in Android using WifiNetworkSpecifier and WifiNetworkSuggestion APIs.


WifiNetworkSpecifier

WifiNetworkSpecifier is a part of the Android 10 (API level 29) addition to the Wi-Fi API. It allows applications to force Wi-Fi connections with specific networks programmatically. However, please note that the system will limit the number of outstanding requests to 100 per app. If this limit is exceeded, an exception will be thrown.

Here's a simple example of how to use it:

WifiNetworkSpecifier specifier = new WifiNetworkSpecifier.Builder()
   .setSsidPattern(new PatternMatcher("test", PatternMatcher.PATTERN_PREFIX))
   .setWpa2Passphrase("test1234")
   .build();

NetworkRequest request = new NetworkRequest.Builder()
   .addTransportType(NetworkCapabilities.TRANSPORT_WIFI)
   .setNetworkSpecifier(specifier)
   .build();

ConnectivityManager connectivityManager = (ConnectivityManager) 
    context.getSystemService(Context.CONNECTIVITY_SERVICE);

NetworkCallback networkCallback = new NetworkCallback() {
   // override necessary methods here
};

connectivityManager.requestNetwork(request, networkCallback);

Remember to unregister the callback when you're done:

connectivityManager.unregisterNetworkCallback(networkCallback);


WifiNetworkSuggestion

WifiNetworkSuggestion API, introduced in Android 10 (API level 29), allows an app to suggest networks for the device to connect to. However, the final decision on whether to switch to the suggested network is made by the system UI.

Here's how to use WifiNetworkSuggestion:

WifiNetworkSuggestion suggestion = new WifiNetworkSuggestion.Builder()
    .setSsid("test")
    .setWpa2Passphrase("test1234")
    .build();

WifiManager wifiManager = (WifiManager) 
    context.getSystemService(Context.WIFI_SERVICE);

int status = wifiManager.addNetworkSuggestions(Collections.singletonList(suggestion));

if (status != WifiManager.STATUS_NETWORK_SUGGESTIONS_SUCCESS) {
    // handle failure, e.g., log the error or inform the user
}

The system remembers network suggestions across reboots. When your app is uninstalled, all its suggestions are removed.


This is a brief introduction to these two APIs, but there's more to explore. Check out the official Android documentation for more details and keep experimenting!


https://developer.android.com/reference/android/net/wifi/WifiNetworkSpecifier
https://developer.android.com/reference/android/net/wifi/WifiNetworkSuggestion


Learning Journey #1: Unraveling the Microservices Architecture

Welcome to the "Learning Journey" series. This space is my personal archive where I share insights and discoveries from my explorations into new tech territories, particularly back-end development and cloud services. As I continue to broaden my tech understanding, I hope this series inspires and contributes to your own learning journey.

Understanding Monolithic Architecture

Before we dive into MSA, let's first talk about Monolithic Architecture. In this architectural style, all software components of an application are interconnected and interdependent. This architecture is simple to develop, test, and deploy initially. However, as the application grows, the complexity increases, making it challenging to maintain and scale.

One of the significant drawbacks of a Monolithic Architecture is the need to build and deploy the entire system, even for a minor function change. This can lead to longer development cycles and makes continuous deployment challenging.

The Emergence of MSA

Due to these characteristics, monolithic architecture isn't suitable for certain types of systems. Microservices Architecture (MSA) can address these limitations by offering increased flexibility, scalability, and deployment speed by dividing the application into smaller, independent services.

Defining MSA

Microservices Architecture (MSA) structures an application as a set of small, independent services, each corresponding to a specific business functionality. Here are some key points:

Decomposition: Applications are broken down into smaller components or services. Each service can be developed, deployed, and scaled independently.

Independence: Each microservice functions independently, allowing changes to be made to one without affecting others. This promotes flexibility and accelerates development and deployment cycles.

Scalability: MSA's significant advantage is its scalability. Individual services can be scaled based on their requirements, leading to more efficient resource use.

Strengths and Weaknesses of MSA

While MSA provides numerous advantages, it's not without its drawbacks. Let's delve into both:

Strengths

  1. Scalability: Each service can be individually scaled based on its requirements.
  2. Independence: Changes can be made to one service without affecting others.
  3. Speed of Deployment: With smaller, independent services, changes can be deployed faster.

Weaknesses

  1. Increased Complexity: MSA might lead to unnecessary fragmentation of services, making management difficult.
  2. Problem Isolation: Identifying the service responsible for a problem can be challenging.
  3. Communication Failures: The need for services to communicate can introduce potential points of failure.
  4. Human Resources: Each service requires its own management, which could demand more human resources.
  5. Potential Performance Issues: The inter-service communication could potentially cause a slowdown in the system's speed.

When considering adopting MSA, it's essential to weigh these strengths and weaknesses against the specific needs and capabilities of your organization."

When to Use MSA

MSA isn't a one-size-fits-all solution. It's suitable for large, complex applications that require high scalability and flexibility. For small, simple applications, a monolithic architecture may be more appropriate.

Monday, May 15, 2023

Daily #10: Quick Dive into Nullability Annotations in Java and Android

Hello! Today, I am going to talk about Nullability Annotations in Java and Android. These annotations - @NotNull, @Nonnull, @NotEmpty, @NotBlank, and @Nullable - are valuable tools to help us avoid unexpected null and empty values leading to runtime errors.

  1. @NotNull and @Nonnull:

These annotations are similar; they declare that a variable, parameter, or method return value should never be null. @NotNull is from JetBrains' annotations library and is widely used in Android and Java development. @Nonnull is from the JSR-305 annotations library. Remember, these annotations themselves do not enforce the non-null behavior at runtime; they're primarily used for compile-time checks by static analysis tools.

Let's see them in action:

// Here, the parameter should never be null.

public void processString(@NotNull String str) {
    // processing of str
}

// The method should never return a null value.
@NotNull
public String provideString() {
    // provide a String
}
  1. @NotEmpty and @NotBlank:

These annotations are used when a CharSequence, Collection, Map, or Array object should not be null and should not be empty. @NotBlank further demands that a CharSequence should not be all whitespace.

Let's look at an example:

// Here, the parameter should never be null or empty.
public void processString(@NotBlank String str) {
    // processing of str
}


// This method should never return a null or empty value.

@NotBlank
public String provideString() {
    // provide a String
}

Please note that these annotations inform developers about the intended behavior of variables, methods, and parameters, but they don't enforce these behaviors at runtime. For runtime enforcement, you would need to manually throw exceptions when these conditions are not met:

public void processString(@NotBlank String str) {
    if (str == null || str.trim().isEmpty()) {
        throw new IllegalArgumentException("processString() received a null or blank string");
    }
    // Continue processing str
}
  1. @Nullable:

The @Nullable annotation indicates that a variable, parameter, or method return value can be null. This is a warning to developers to expect and handle null values appropriately.

// Here, the parameter can be null.
public void processString(@Nullable String str) {
    if (str == null) {
        // Handle null case here
    } else {
        // Continue processing str
    }
}


// This method can return a null value.

@Nullable

public String provideString() {
    // provide a String or null
}

Using these annotations makes your code more understandable and safer, preventing common runtime errors like NullPointerException and IllegalArgumentException.

In tomorrow's post, we'll discuss other annotation types and how they can enhance your code's robustness and readability. Stay tuned!

Saturday, May 13, 2023

Daily#9. A Quick Dive into Android's AIDL

 One of Android's hidden gems is AIDL - Android Interface Definition Language. It's a tool that facilitates communication between processes running in different applications, a concept known as IPC (Inter-Process Communication).


 AIDL allows you to define the programming interface that both the client and service agree upon to communicate with each other using IPC. The beauty of AIDL is that it can handle method calls with complex data types across different processes seamlessly.

 Creating an AIDL interface is similar to creating an interface in Java. However, only certain data types are supported, such as primitives, String, CharSequence, List, and Map.

Here's a simple example of an AIDL file:

// IMyAidlInterface.aidl
package com.example;

interface IMyAidlInterface {
    void basicTypes(int anInt, long aLong, boolean aBoolean, float aFloat,
        double aDouble, String aString);
}


Once you've defined your interface, the Android system will generate an interface in Java with your methods, which you can then implement in your service.

Remember, AIDL should be used only when you need to perform IPC, as using it within a single application or process can add unnecessary complexity and overhead.

Now, let's create an AIDL service. This involves implementing the interface we defined in the AIDL file:

public class MyAidlService extends Service {
    private final IMyAidlInterface.Stub mBinder = new IMyAidlInterface.Stub() {
        public void basicTypes(int anInt, long aLong, boolean aBoolean, float aFloat,
            double aDouble, String aString) {
            // Implement your functionality here
        }
    };

    @Override
    public IBinder onBind(Intent intent) {
        return mBinder;
    }
}


Let's call the AIDL service from another application. We need to bind to the service using an Intent that specifies the service's action and package:

private IMyAidlInterface mService;
private ServiceConnection mConnection = new ServiceConnection() {
    public void onServiceConnected(ComponentName className, IBinder service) {
        mService = IMyAidlInterface.Stub.asInterface(service);
    }

    public void onServiceDisconnected(ComponentName className) {
        mService = null;
    }
};

void bindService() {
    Intent intent = new Intent("com.example.MY_AIDL_SERVICE");
    intent.setPackage("com.example");
    bindService(intent, mConnection, Context.BIND_AUTO_CREATE);
}


Once the service is connected, you can call methods on mService just like any other Java object, despite it being in a separate process!

Remember to unbind from the service when you're done using it to prevent memory leaks.

And there you have it! With AIDL, you can communicate between processes in Android. Keep in mind, though, that IPC should be used sparingly as it can introduce latency and complexity.


Daily#8. Understanding Static Methods and Variables in Android Development

 In the world of Android development, the static keyword plays an essential role. Understanding how and when to use static methods and variables can greatly improve your Android development skills.

 The static keyword in Java means that the method or variable is associated with the class, rather than instances of the class. This implies that you can access static methods and variables without creating an instance of the class.

Static Variables

Static variables are shared among all instances of a class. They're initialized only once, at the start of the execution. Here's an example:

public class MyClass {
    static int sharedVar = 10;
}


In this example, sharedVar is a static variable. If you create two instances of MyClass and modify sharedVar, they'll both operate on the same sharedVar, not their own copies. Remember to use them carefully as they remain in memory for the lifetime of your application, which can potentially cause memory leaks.


Static Methods

Static methods, like static variables, are associated with the class, not instances of the class. They can be accessed without creating an instance of the class.

Here's an example:

public class MyClass {
    static void myStaticMethod() {
        // do something
    }
}


You can call this method like so: MyClass.myStaticMethod();.


Use Cases in Android Development

Utility methods: Static methods are often used for utility or helper methods that don't rely on the state of an object. For example, converting dp to pixels.

Singletons: Static variables can be used to implement singleton classes - classes where only one instance should ever be created. This is common in Android for classes like DatabaseHelper.


While static methods and variables can be very useful, they should be used judiciously. Improper use can lead to issues like memory leaks, especially in the context of Android development. Remember, a static variable stays in memory for the lifetime of the application, and static methods can't directly access non-static methods or variables in the same class.

In the end, understanding when and where to use static methods and variables will help you write cleaner and more efficient Android code. Happy coding!

Thursday, May 11, 2023

Daily#7. Simplifying Android Code with Lambda Expressions

 Java 8 introduced Lambda expressions, a new language feature which allows us to write our code more concisely and readably. They can be particularly useful in Android development, where handling events often requires the use of anonymous inner classes. 

What are Lambda Expressions?
Lambda expressions are anonymous functions; they're a way to represent instances of functional interfaces in a concise manner. A functional interface is an interface with just one abstract method.

Benefits of Using Lambda Expressions
1. Conciseness : Lambda expressions can make your code more compact by reducing boilerplate, particularly when dealing with anonymous inner classes.
2.Readability : With less boilerplate, your code becomes more focused on what you're trying to achieve, making it easier to read.

Using Lambda Expressions in Android
Lambda expressions can be particularly helpful in handling UI events, such as button clicks. Here's an example that contrasts the traditional way of handling a button click with the lambda approach:

Without Lambda Expressions (Anonymous Inner Class)
Button button = findViewById(R.id.myButton);button.setOnClickListener(new View.OnClickListener() {
    @Override
    public void onClick(View v) { // handle button click
    }
});

With Lambda Expressions
Button button = findViewById(R.id.myButton);
button.setOnClickListener(v -> { 
    // handle button click
});


Lambda expressions can make your Android code more readable and less verbose, particularly when dealing with UI events. It's a powerful tool to have in your Android development toolkit.
---
Note: Android supports lambda expressions only if you're using Android Studio 3.0 or higher, and have set your project's compile options to use Java 8.

Daily#6. Understanding and Using NetworkCallback in Android

The NetworkCallback class plays a crucial role in handling network changes in Android. It allows apps to monitor the network's state and perform actions accordingly. It has different types such as DefaultNetworkCallback, Request type NetworkCallback and Listen type NetworkCallback.

Default Network

 In Android, the "default network" refers to the network that is currently being used for internet traffic. Most of the time, it is the network that your device is connected to for accessing the internet, either via Wi-Fi or mobile data.

 The default network can change based on factors like network availability, signal strength, and user preferences. For instance, if you're connected to both Wi-Fi and mobile data, Android generally defaults to using Wi-Fi because it's typically faster and doesn't incur data charges. However, if the Wi-Fi signal becomes weak or disconnects, Android will automatically switch the default network to mobile data (if available) to maintain internet connectivity.

 So, when we talk about a "DefaultNetworkCallback" in Android, we are referring to a callback method that will be invoked when the device's default network changes, such as when the device connects to or disconnects from a network. This allows your app to respond to changes in the device's internet connectivity, providing opportunities for improving user experience and app performance.

 DefaultNetworkCallback is a convenience callback that apps can use to handle the availability of the default network:
final ConnectivityManager.NetworkCallback networkCallback = new ConnectivityManager.NetworkCallback() {
    @Override
    public void onAvailable(Network network) {
        // Handle the availability of the default network
    }

    @Override
    public void onLost(Network network) {
        // Handle the loss of the default network
    }
};

connectivityManager.registerDefaultNetworkCallback(networkCallback);

Listen vs Request NetworkCallback
When it comes to network requests, Android's ConnectivityManager offers two types of NetworkCallback: Request type and Listen type.
Here's a more detailed comparison:

Request type NetworkCallback:
When you call requestNetwork(), Android tries to satisfy your NetworkRequest. It essentially means "I need a network with these capabilities". Android will then attempt to switch to or bring up a network that meets the request, if one is not already available.

This method should be used when your app cannot accomplish its task without a network that has the capabilities defined by the NetworkRequest.

In simpler terms, a Request type NetworkCallback is an active request, Android will take action to satisfy your request.
 
NetworkRequest request = new NetworkRequest.Builder()
    .addTransportType(NetworkCapabilities.TRANSPORT_WIFI)
    .build();

connectivityManager.requestNetwork(request, networkCallback);

Listen type NetworkCallback:
When you call registerNetworkCallback(), you're saying "Let me know when a network of this nature comes up". However, unlike requestNetwork(), this method does not cause any sort of network switchover or any attempt to satisfy the NetworkRequest.

Use this method when your app can alternatively use whichever network is available or when you just want to know when a network of interest is available.
NetworkRequest request = new NetworkRequest.Builder()
    .addTransportType(NetworkCapabilities.TRANSPORT_WIFI)
    .build();

connectivityManager.registerNetworkCallback(request, networkCallback);

Please, refer to Daily#2 for implementing NetworkCallback. 

 In summary, the key difference between the two is that requestNetwork() is an active request where Android will try to satisfy your network needs, while registerNetworkCallback() is more of a passive listener and won't cause Android to take any action other than notifying you of network changes.

Remember: To use these APIs, you need to add the ACCESS_NETWORK_STATE and CHANGE_NETWORK_STATE permissions to your manifest:
<uses-permission android:name="android.permission.ACCESS_NETWORK_STATE" />
<uses-permission android:name="android.permission.CHANGE_NETWORK_STATE" />


Daily#5. Android's Message and Handler

 Android's Message and Handler classes are key components of its message passing framework. They're used to schedule and execute code at a future point in time, and on a specific thread.

 A Message represents a command that can be dispatched for processing. A Handler allows you to send and process Message and Runnable objects associated with a thread's MessageQueue. 

 Here's a simple example of sending a Message from a background thread to the main thread:
Handler handler = new Handler(Looper.getMainLooper());

Message message = handler.obtainMessage();
// Set what, arg1, arg2, or obj if needed
handler.sendMessage(message);

Remember: Always obtain a Message from a Handler instance. This ensures the Message is correctly associated with the Handler's Looper.

Daily#4. Android's Threading Model and Looper

 Android uses a single-threaded model for UI operations, meaning all UI updates must happen on the main thread. The Looper class plays a crucial role in this model.

 Looper is a part of Android's message passing framework. It's designed to keep a thread alive and to process Messages and Runnable objects from a MessageQueue.


 Here's how you can use a Looper in a background thread:

class ExampleThread extends Thread {
    public Handler handler;

    public void run() {
        Looper.prepare();

        handler = new Handler();

        Looper.loop();
    }
}

Remember: Don't perform long-running operations on the main thread to avoid UI freezing. Use a background thread with a Looper for such tasks!

Daily#3. Understanding Android's Intent

In Android, an Intent is a software mechanism for describing an operation to be performed. It's a fundamental concept that facilitates communication between components such as activities, services, and broadcast receivers.

An Intent can be explicit, where you specify the component to start by name, or implicit, where you declare a general action to perform and the system finds an appropriate component for you.

Here's a simple example of explicit intent:


Intent intent = new Intent(this, TargetActivity.class);
startActivity(intent);
  

And an example of an implicit intent:


Intent intent = new Intent(Intent.ACTION_VIEW, Uri.parse("http://www.example.com"));
startActivity(intent);
  

Remember: Always declare intent filters for your components in the manifest if you want them to respond to implicit intents!

Wednesday, May 10, 2023

Daily#2. Handling Network Connectivity Issues in Android Apps

 When developing an Android app, it's important to ensure your app can handle network connectivity issues, especially when switching between Wi-Fi and mobile data. Android provides APIs to monitor network connectivity and report issues to help you manage your app's behavior in different network situations.
  1. Register a `ConnectivityManager.NetworkCallback` to monitor network changes:
    private ConnectivityManager connectivityManager;
    private ConnectivityManager.NetworkCallback networkCallback;
    
    private void registerNetworkCallback(Context context) {
        connectivityManager = (ConnectivityManager) context.getSystemService(Context.CONNECTIVITY_SERVICE);
        networkCallback = new ConnectivityManager.NetworkCallback() {
            @Override
            public void onAvailable(Network network) {
                // Handle network connection established
            }
    
            @Override
            public void onCapabilitiesChanged(@NonNull Network network, @NonNull NetworkCapabilities nc) {
                // onCapabilitiesChanged
                boolean valid = nc.hasCapability(NetworkCapabilities.NET_CAPABILITY_VALIDATED);
            }
    
            @Override
            public void onLost(Network network) {
                // Handle network connection lost
            }
        };
    
        NetworkRequest.Builder builder = new NetworkRequest.Builder();
        connectivityManager.registerNetworkCallback(builder.build(), networkCallback);
    }     
  2. Don't forget to unregister the `NetworkCallback` when it's no longer needed, such as in your Activity's `onDestroy()` method:
    @Override
    protected void onDestroy() {
        super.onDestroy();
        if (connectivityManager != null && networkCallback != null) {
            connectivityManager.unregisterNetworkCallback(networkCallback);
        }
    }
  3. Report network connectivity problems using ConnectivityManager.reportNetworkConnectivity():
    private void reportNetworkConnectivity(Context context, boolean hasProblem) {
        Network activeNetwork = connectivityManager.getActiveNetwork();
        if (activeNetwork != null) {
            connectivityManager.reportNetworkConnectivity(activeNetwork, hasProblem);
        }
    }   

With these code snippets, your app can monitor and respond to network connectivity changes and provide a better user experience by handling Wi-Fi and mobile data transitions more gracefully. Remember to request the ACCESS_NETWORK_STATE permission in your AndroidManifest.xml file to use the ConnectivityManager APIs:
  <uses-permission android:name="android.permission.ACCESS_NETWORK_STATE" />

Daily#1. Using BroadcastReceivers for Alarm Functionality in Android Apps

In Android app development, one common way to implement alarm functionality is to use BroadcastReceiver. This allows your app to receive intents that are broadcast by other apps or the system itself, and take appropriate action based on those intents.

public class AlarmReceiver extends BroadcastReceiver {
    @Override
    public void onReceive(Context context, Intent intent) {
        // Your custom alarm action here
    }
}
To set an alarm, use the AlarmManager system service, and set the appropriate PendingIntent to broadcast your custom intent:
private void setAlarm(long triggerAtMillis, Context context) {
    AlarmManager alarmManager = (AlarmManager) context.getSystemService(Context.ALARM_SERVICE);
    Intent intent = new Intent(context, AlarmReceiver.class);
    PendingIntent pendingIntent = PendingIntent.getBroadcast(context, 0, intent, 0);
    alarmManager.setExact(AlarmManager.RTC_WAKEUP, triggerAtMillis, pendingIntent);
}
Don't forget to register your BroadcastReceiver in the AndroidManifest.xml file:

<receiver android:name=".AlarmReceiver"/>

My very first post


Hope it lasts long 

previous blog

Learning Journey #6: Brief Exploration of Databases and its Management Systems

  Welcome to the "Learning Journey" series. This space is my personal archive where I share insights and discoveries from my explo...